

Building Secure Azure Cloud VM Images Using Packer
DevOps!!... SHIFT LEFT <-


Build it now ... Secure it later
- Average Engineer
Although we have started a wave of securing our infrastructure, still there is a long way to go for people to adopt a security mindset while building their projects bottom up. There are many ways you can do that but automating these tasks can save a lot of manpower and mental fuss.
Hashicorp Packer does a fab job in creating secure images and here we will be using Packer. It helps standardize and automate the majority of the hassle tasks, allowing us to focus on the main pieces of the puzzle.
Requirement 📋
Let’s dive into Image creation with Packer!
But before that, we have a few requirements to meet.
Install Packer
Install Azure CLI (as we are working with Azure)
Azure credential set of
Client ID, Client secret, and Tenant IDYour Azure account’s
subscription ID
Getting Started 🏃
Now, let’s jump to the actual building blocks. 🧱
First, we need to make sure we have Azure integration with Packer.
You can do this by either:
- Adding the below code in your Packer configuration and run
packer init
packer {
  required_plugins {
    azure = {
      source  = "github.com/hashicorp/azure"
      version = "~> 2"
    }
  }
}
2. Or, you can run the below command
packer plugins install github.com/hashicorp/azure
Both ways, your environment will have Azure integration ready for your Packer to use.
You need to add your Azure account secrets, details of your resource group and image source, and other information like tags, location, and VM size. Then you need to put brains in this script by adding your hardening checks.
Refer to this amazing document created by Microsoft — https://learn.microsoft.com/en-us/azure/governance/policy/samples/guest-configuration-baseline-linux
For example hardening script ... you can get a kick start with this Ubuntu hardening script:
** Thank me later...
"mkdir -p /etc/hardening",
"touch /etc/hardening/hardeningScript.txt",
"echo \"Script is in progress... - $(date)\" >> /etc/hardening/hardeningScript.txt",

"apt -y update",
"apt --fix-broken install",
"apt -y upgrade",
"echo -e '\\n' | add-apt-repository universe",
"apt -y autoremove",

"apt remove prelink",
"apt remove talk",
"apt-get remove inetd",
"apt-get remove xinetd",
"apt-get remove rsh-server",
"apt-get remove nis",
"apt-get remove tftpd",
"apt-get remove readahead-fedora",
"apt-get remove bluetooth",
"apt-get remove isdnutils-base",
"apt-get remove kdump-tools",

"chmod 644 /etc/motd",
"chmod 644 /etc/issue",
"chmod 644 /etc/issue.net",
"chmod 644 /etc/hosts.allow",
"chmod 644 /etc/hosts.deny",
"chown root:root /etc/ssh/sshd_config",
"chmod 600 /etc/ssh/sshd_config",
"chmod 400 /etc/shadow",
"chmod 400 /etc/shadow-",
"chmod 400 /etc/gshadow",
"chmod 400 /etc/gshadow-",
"chmod 400 /etc/passwd",
"chmod 400 /etc/group",
"chmod 400 /etc/passwd-",
"chmod 400 /etc/group-",
"chmod 750 /home",

"grep -q '$FileCreateMode' /etc/rsyslog.conf && sed -i 's/^$FileCreateMode.*/$FileCreateMode 0640/' /etc/rsyslog.conf || echo '$FileCreateMode 0640' | sudo tee -a /etc/rsyslog.conf",
"grep -q '$FileGroup' /etc/rsyslog.conf && sed -i 's/^$FileGroup.*/$FileGroup adm/' /etc/rsyslog.conf || echo '$FileGroup adm' | sudo tee -a /etc/rsyslog.conf",
"grep -q '^Protocol' /etc/ssh/sshd_config && sed -i 's/^Protocol.*/Protocol 2/' /etc/ssh/sshd_config || echo 'Protocol 2' >> /etc/ssh/sshd_config",
"grep -q '^IgnoreRhosts' /etc/ssh/sshd_config && sed -i 's/^IgnoreRhosts.*/IgnoreRhosts yes/' /etc/ssh/sshd_config || echo 'IgnoreRhosts yes' >> /etc/ssh/sshd_config",
"grep -q '^LogLevel' /etc/ssh/sshd_config && sed -i 's/^LogLevel.*/LogLevel INFO/' /etc/ssh/sshd_config || echo 'LogLevel INFO' >> /etc/ssh/sshd_config",
"grep -q '^MaxAuthTries' /etc/ssh/sshd_config && sed -i 's/^MaxAuthTries.*/MaxAuthTries 6/' /etc/ssh/sshd_config || echo 'MaxAuthTries 6' >> /etc/ssh/sshd_config",
"grep -q '^RhostsRSAAuthentication' /etc/ssh/sshd_config && sed -i 's/^RhostsRSAAuthentication.*/RhostsRSAAuthentication no/' /etc/ssh/sshd_config || echo 'RhostsRSAAuthentication no' >> /etc/ssh/sshd_config",
"grep -q '^HostbasedAuthentication' /etc/ssh/sshd_config && sed -i 's/^HostbasedAuthentication.*/HostbasedAuthentication no/' /etc/ssh/sshd_config || echo 'HostbasedAuthentication no' >> /etc/ssh/sshd_config",
"grep -q '^PermitEmptyPasswords' /etc/ssh/sshd_config && sed -i 's/^PermitEmptyPasswords.*/PermitEmptyPasswords no/' /etc/ssh/sshd_config || echo 'PermitEmptyPasswords no' >> /etc/ssh/sshd_config",

"apt install -y openssh-server",
"sed -i '/^#*\\s*PermitRootLogin/c\\PermitRootLogin no' /etc/ssh/sshd_config",
"sed -i '/^password.*pam_unix.so/ s/$/ minlen=14 minclass=4 dcredit=-1 ucredit=-1 ocredit=-1 lcredit=-1/' /etc/pam.d/common-password",
"sed -i '/^auth.*pam_unix.so/ s/$/ maxfail=3 deny=10/' /etc/pam.d/common-auth",

"echo \"Script was a success - $(date)\" >> /etc/hardening/hardeningScript.txt"
** THIS IS LATER...
GO HIT THE LIKE BUTTON ❤️
** aheemmm...
Anyways...
Let me help you get each of these before we move forward.
- Create a
Resourse Group
az group create -n myResourceGroup -l eastus
2. Get your Subscription ID
az account show --query "{ subscription_id: id }"
3. Create a Service Principle
az ad sp create-for-rbac --role Contributor --scopes /subscriptions/<subscription_id> --query "{ client_id: appId, client_secret: password, tenant_id: tenant }"
Your output will look like this:
{
    "client_id": "f5b6a5cf-fbdf-4a9f-b3b8-3c2cd00225a4",
    "client_secret": "0e760437-bf34-4aad-9f8d-870be799c55d",
    "tenant_id": "72f988bf-86f1-41af-91ab-2d7cd011db47"
}
The Backbone bone 🦴
Now, let’s look at the soul of our code, The Builder Section of our code.
Here too, you have two options to create your builder.
[ Here I am using Ubuntu for demonstration ]
- The HashiCorp Way 🥷 — in HCL
source "azure-arm" "autogenerated_1" {
  azure_tags = {
    dept = "Engineering"
    task = "Image deployment"
  }
  client_id                         = "f5b6a5cf-fbdf-4a9f-b3b8-3c2cd00225a4"
  client_secret                     = "0e760437-bf34-4aad-9f8d-870be799c55d"
  image_offer                       = "0001-com-ubuntu-server-jammy"
  image_publisher                   = "canonical"
  image_sku                         = "22_04-lts"
  location                          = "East US"
  managed_image_name                = "myPackerImage"
  managed_image_resource_group_name = "myResourceGroup"
  os_type                           = "Linux"
  subscription_id                   = "xxxxxxxx-xxxx-xxxx-xxxx-xxxxxxxxxxx"
  tenant_id                         = "72f988bf-86f1-41af-91ab-2d7cd011db47"
  vm_size                           = "Standard_DS2_v2"
}

build {
  sources = ["source.azure-arm.autogenerated_1"]

  provisioner "shell" {
    execute_command = "chmod +x {{ .Path }}; {{ .Vars }} sudo -E sh '{{ .Path }}'"
    inline          = ["apt-get update", "apt-get upgrade -y", "apt-get -y install nginx", "/usr/sbin/waagent -force -deprovision+user && export HISTSIZE=0 && sync"]
    inline_shebang  = "/bin/sh -x"
  }

}
2. The good ol’ fashion — JSON ➿
{
  "builders": [{
    "type": "azure-arm",

    "client_id": "f5b6a5cf-fbdf-4a9f-b3b8-3c2cd00225a4",
    "client_secret": "0e760437-bf34-4aad-9f8d-870be799c55d",
    "tenant_id": "72f988bf-86f1-41af-91ab-2d7cd011db47",
    "subscription_id": "xxxxxxxx-xxxx-xxxx-xxxx-xxxxxxxxxxx",

    "managed_image_resource_group_name": "myResourceGroup",
    "managed_image_name": "myPackerImage",

    "os_type": "Linux",
    "image_publisher": "canonical",
    "image_offer": "0001-com-ubuntu-server-jammy",
    "image_sku": "22_04-lts",

    "azure_tags": {
        "dept": "Engineering",
        "task": "Image deployment"
    },

    "location": "East US",
    "vm_size": "Standard_DS2_v2"
  }],
  "provisioners": [{
    "execute_command": "chmod +x {{ .Path }}; {{ .Vars }} sudo -E sh '{{ .Path }}'",
    "inline": [
      "apt-get update",
      "apt-get upgrade -y",
      "apt-get -y install nginx",
      "/usr/sbin/waagent -force -deprovision+user && export HISTSIZE=0 && sync"
    ],
    "inline_shebang": "/bin/sh -x",
    "type": "shell"
  }]
}
THE END GAME!! ✊
The step where we create our mighty AZURE Hardened Image!! 🌅
Execute!! —
# To validate your configuration
$ packer validate <file_name>

# To start packer magic
$ packer build <file_name>
Additional Information ℹ️
Maybe not for Ubuntu but for images like Rocky Linux, you need to add plan information when creating the builder file.
"plan_info": {
        "plan_name": "free",
        "plan_publisher": "erockyenterprisesoftwarefoundationinc1653071250513",
        "plan_product": "rockylinux"
      },
Find your image 📸
To find relevant information for your image:
Execute the following in your terminal.
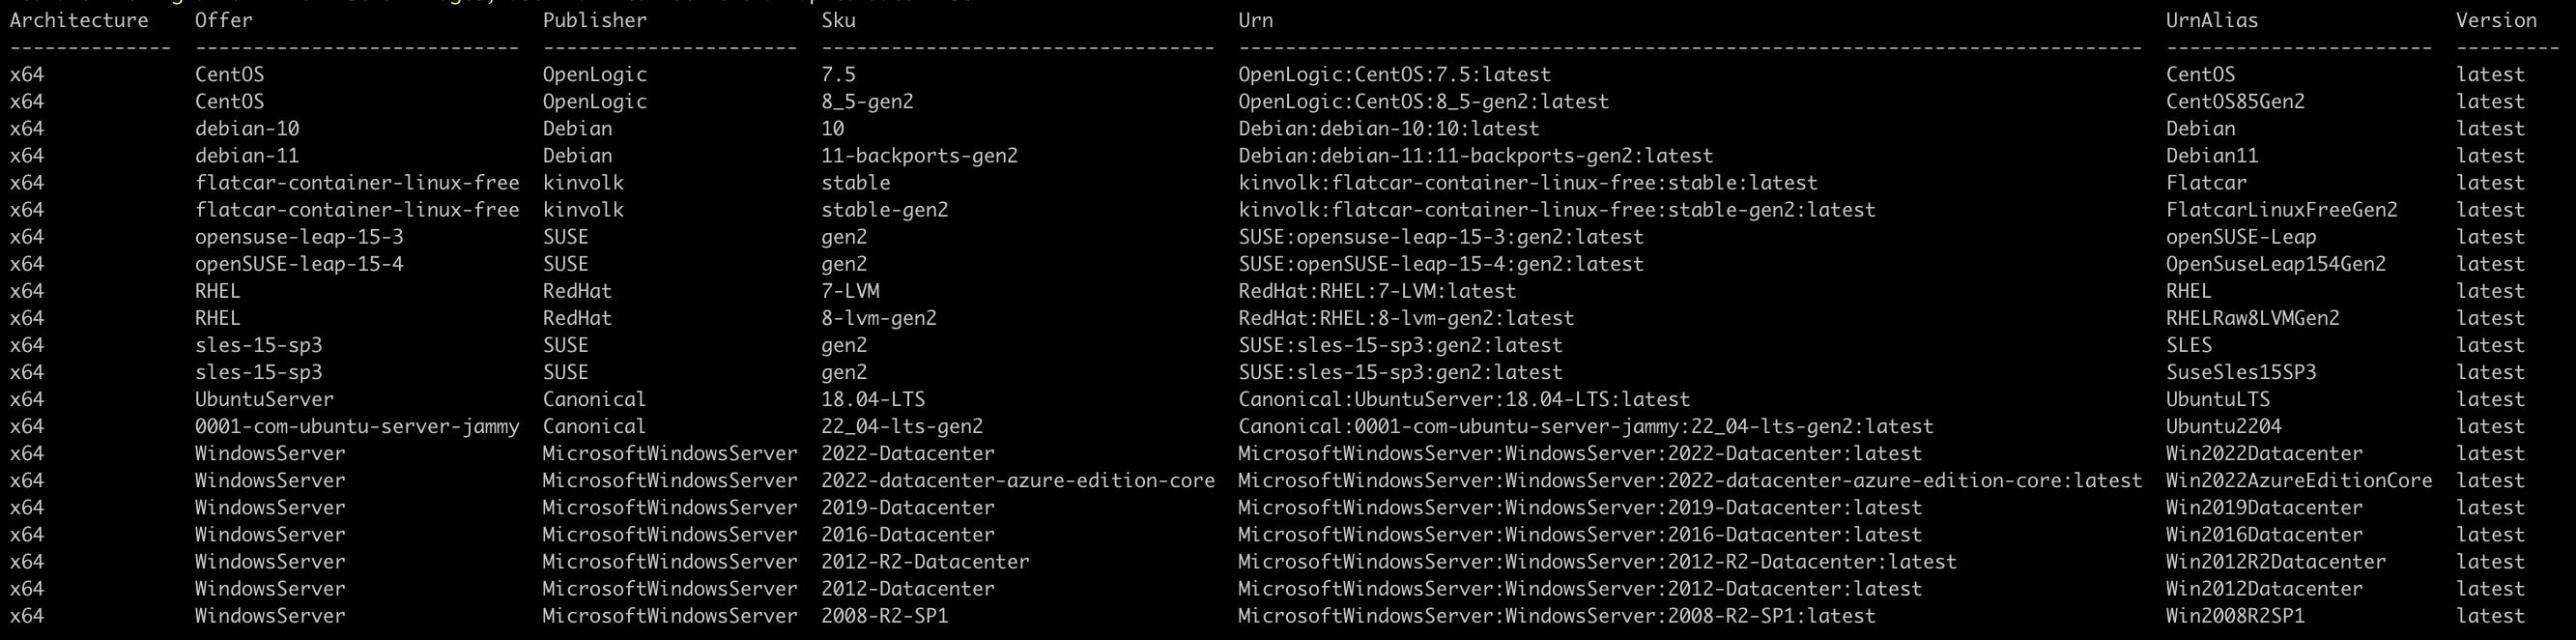
$ az vm image list --output table
You will get output like this:
$ az vm image list --offer <image_name> --all --output table
You will get an information list like this:
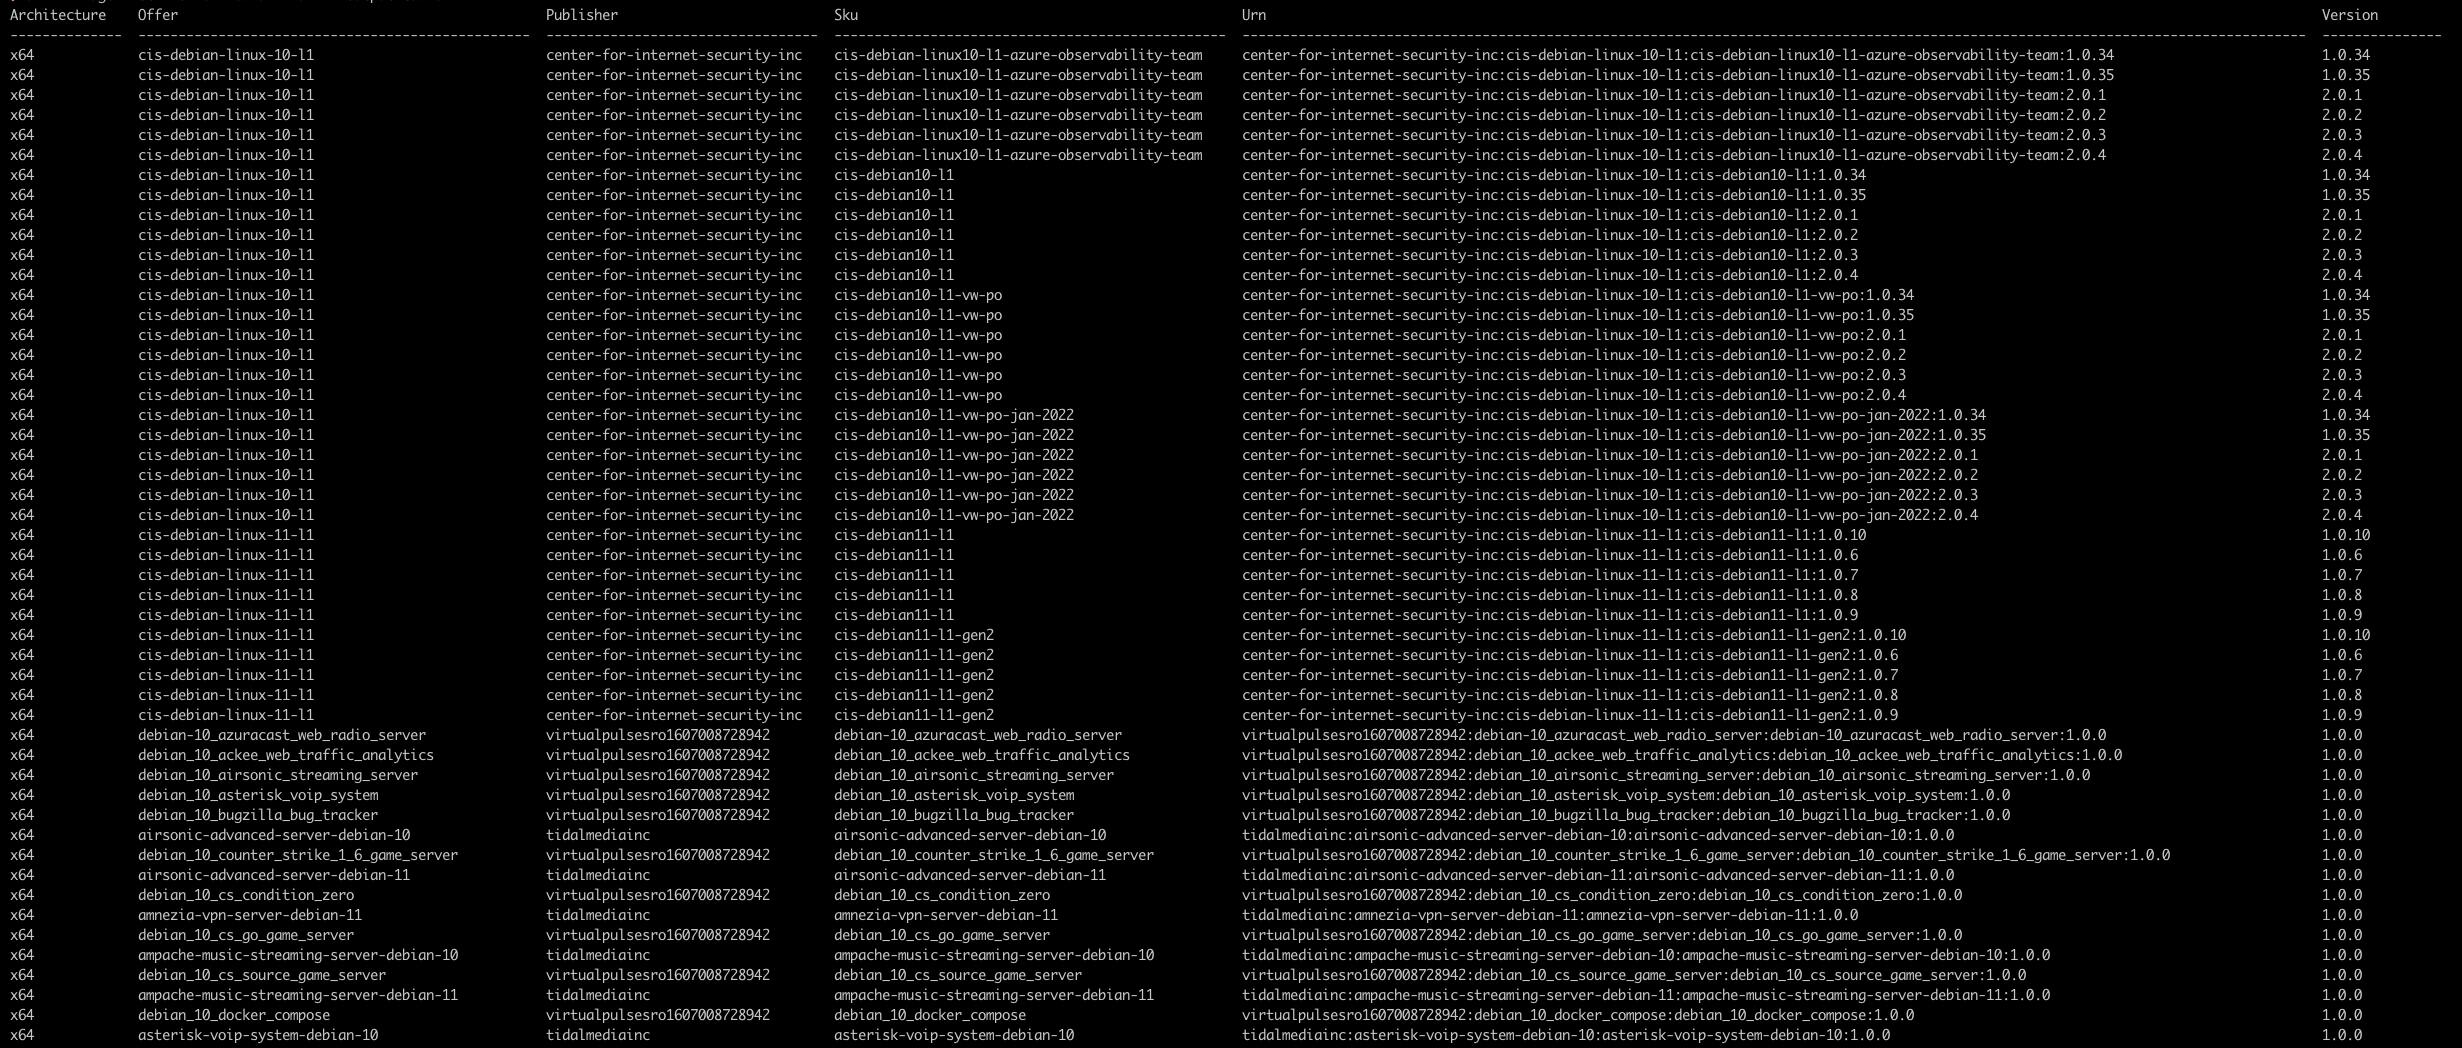
From here ... select your image and plan information from the list above.
That's all folks 🐰
Until next time...
The Modern Witcher ⚔️